
How to Resize Images Online Without Losing Quality
Learn how to resize images for websites, social media, email and printing while keeping your photos sharp, properly proportioned and easy to upload.
Quick summary
The best way to resize images without losing quality is to keep the original aspect ratio, avoid extreme upscaling and choose dimensions that match the final use. A browser-based image resizer can quickly adjust width and height for websites, social media, email, thumbnails and printing.
Key takeaways
- Keep the aspect ratio to avoid stretched or distorted images.
- Resize images before uploading them to improve page speed and reduce file weight.
- Compress images after resizing when you need smaller files for web or email.
What does it mean to resize an image?
Resizing an image means changing its pixel dimensions, usually by adjusting the width, height or both. For example, a photo that is 4000 × 3000 pixels may be resized to 1200 × 900 pixels for a blog post or 1080 × 1080 pixels for a square social media post.
Resizing is different from cropping. Cropping removes part of the image, while resizing changes the overall dimensions. Resizing is also different from compression, which reduces file size by optimizing image data.
How to resize images online step by step
Using an online image resizer is usually the fastest way to prepare images for websites, email, social media and documents. You upload the image, choose the new size, keep the aspect ratio and download the resized version.
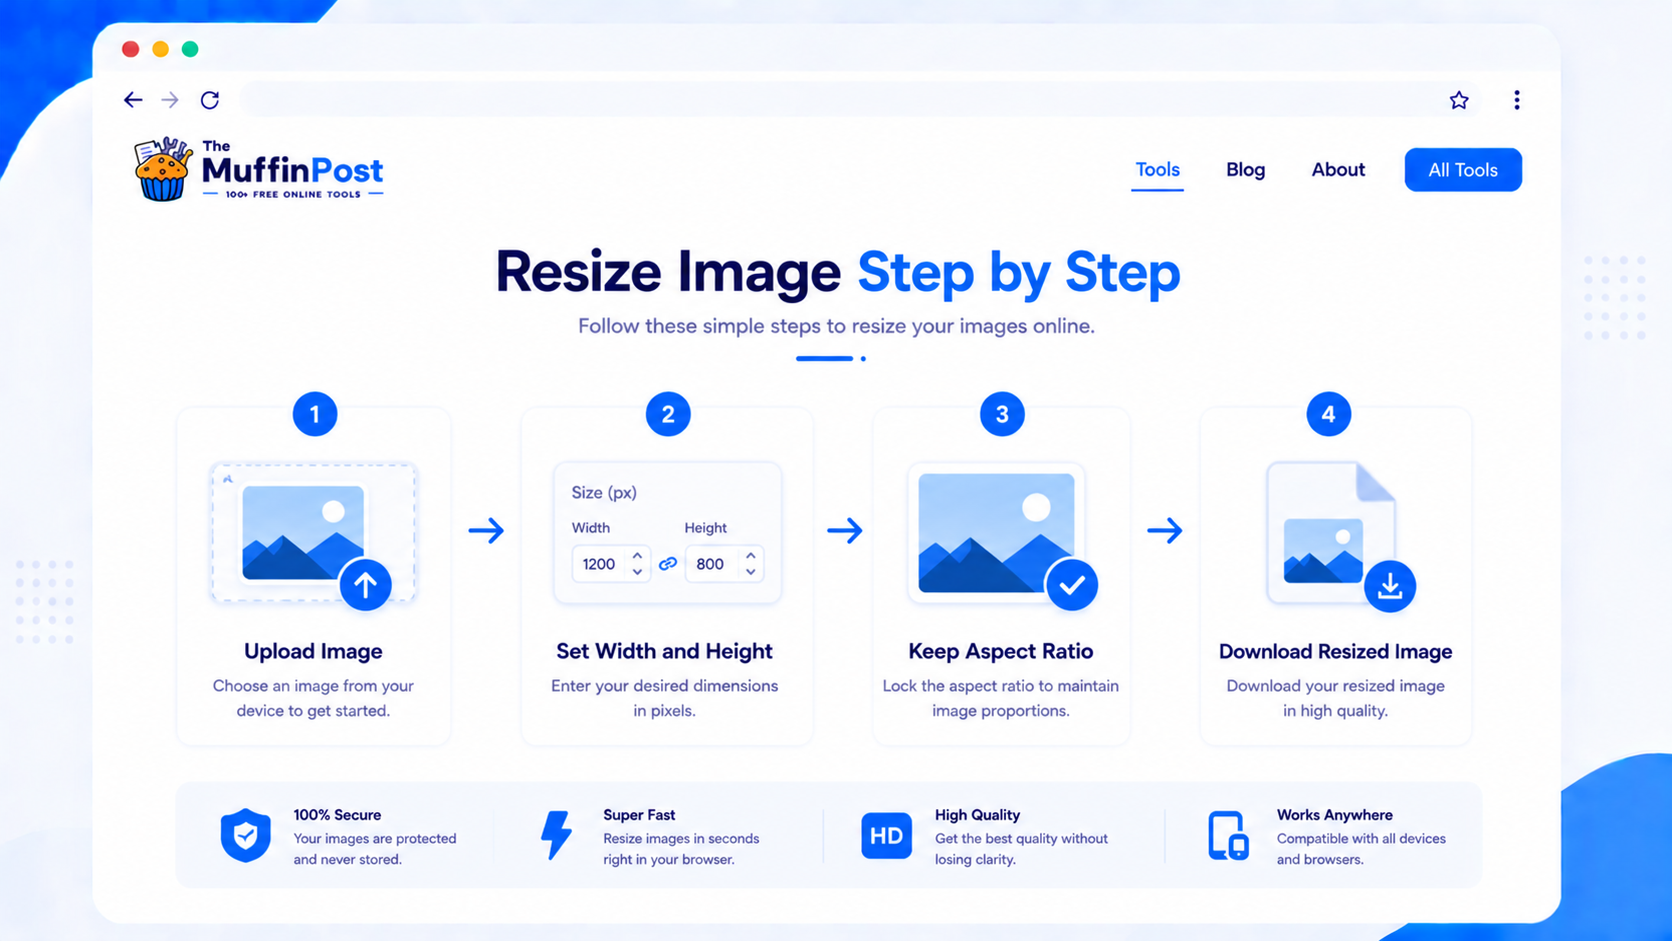
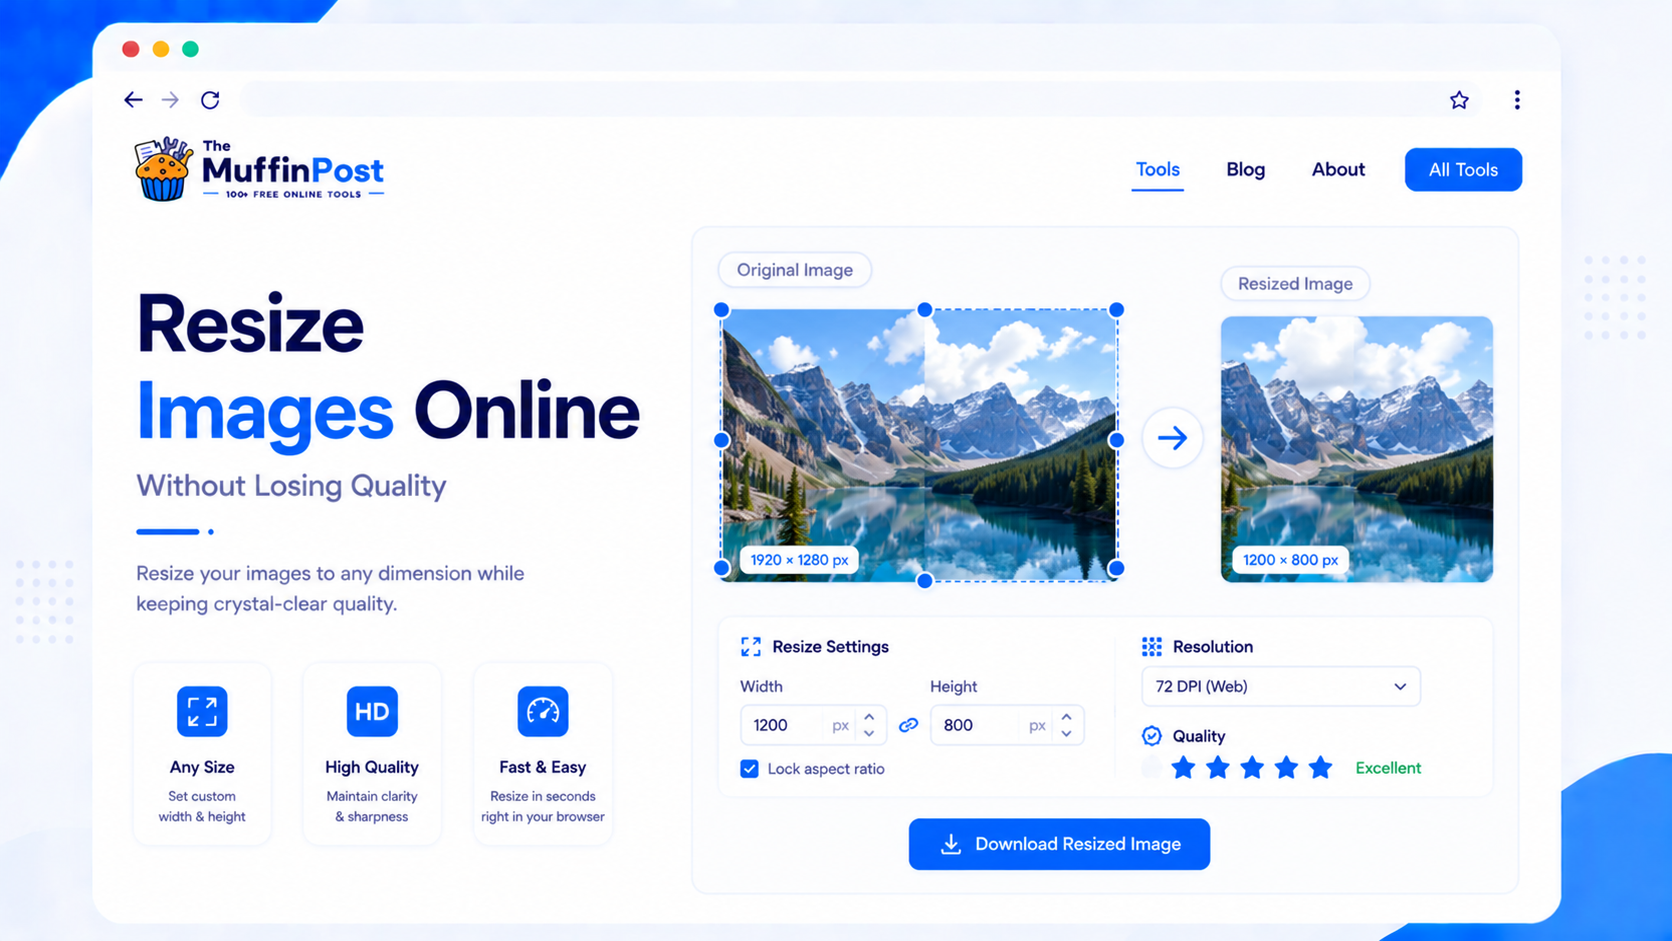
Step 1: Open the Resize Image tool
Start with the Resize Image tool. It helps you adjust image dimensions directly in your browser.
Step 2: Upload your image
Select the image you want to resize. For best results, start with the highest-quality version available, especially if you plan to use the image on a website or in a presentation.
Step 3: Set width and height
Choose the target dimensions. If you are unsure, start by resizing the longest side and keeping the aspect ratio enabled.
Step 4: Download the resized image
After resizing, download the result and check that the image still looks sharp, balanced and properly proportioned.
Complete image resizing workflow
Resizing is usually one step in a larger optimization process. Use the workflow that matches where the image will be published.
Common image dimensions
The ideal dimensions depend on where the image will be used. A website banner, social media post, email header and thumbnail all need different sizes.

| Use case | Common size | Best practice |
|---|---|---|
| Blog hero image | 1200 × 675 | Use a 16:9 ratio for clean previews. |
| Instagram square post | 1080 × 1080 | Keep important content centered. |
| YouTube thumbnail | 1280 × 720 | Use strong contrast and readable text. |
| Website banner | 1920 × 1080 | Compress after resizing for faster loading. |
| Email header | 600 × 200 | Keep the design simple and lightweight. |
Choose dimensions based on the final use
Do not resize every image to the same dimensions. Match the output size to the page layout, platform or device where the image will appear.
Website content
Use the actual maximum display width of the page. Avoid uploading a 4000-pixel photo when the content area only displays 1200 pixels.
Social media
Use platform-specific dimensions and keep important subjects away from edges that may be cropped.
Printing
Keep more pixels than you would for a website. Printing usually needs higher resolution than screens.
Start here: resize your image
Choose the dimensions you need, keep the aspect ratio and continue with compression or format conversion for the best final result.
Open Resize ImageView Image ToolsHow to resize images without losing quality
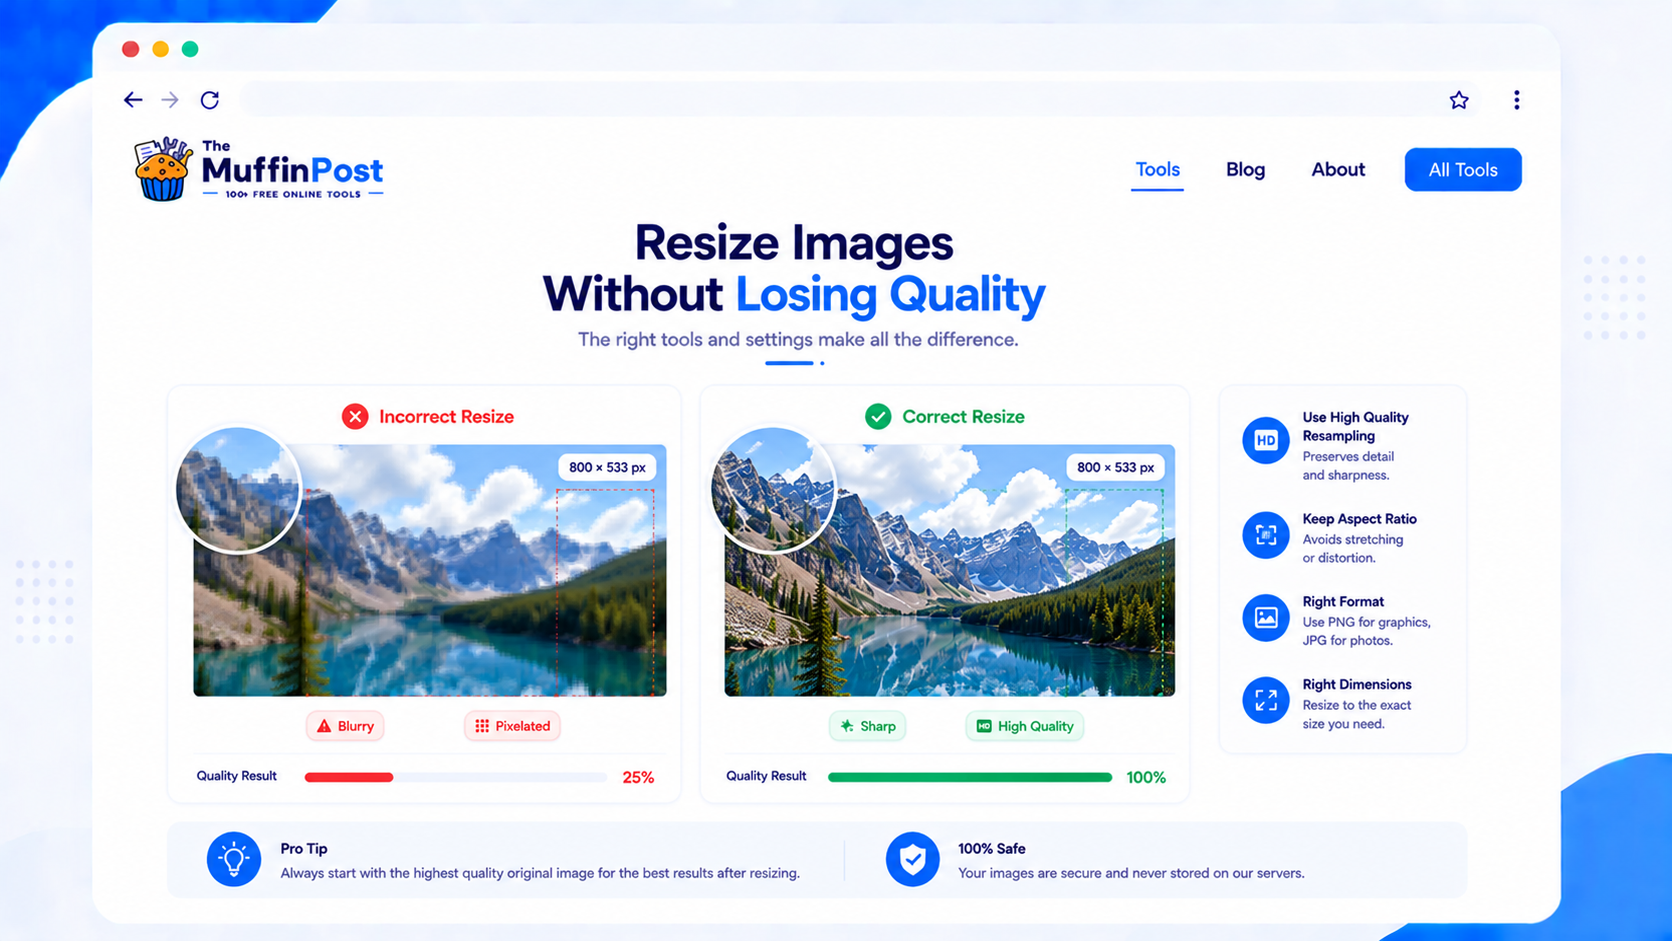
Quality loss usually happens when an image is stretched, upscaled too much or saved with very low compression settings. The safest approach is to reduce dimensions rather than enlarge them, keep the aspect ratio and choose the correct output format.
Common image resizing mistakes

Changing width and height independently can distort the image. Keep the aspect ratio whenever possible.
Making a very small image much larger often creates blur or pixelation.
Best practices for image resizing
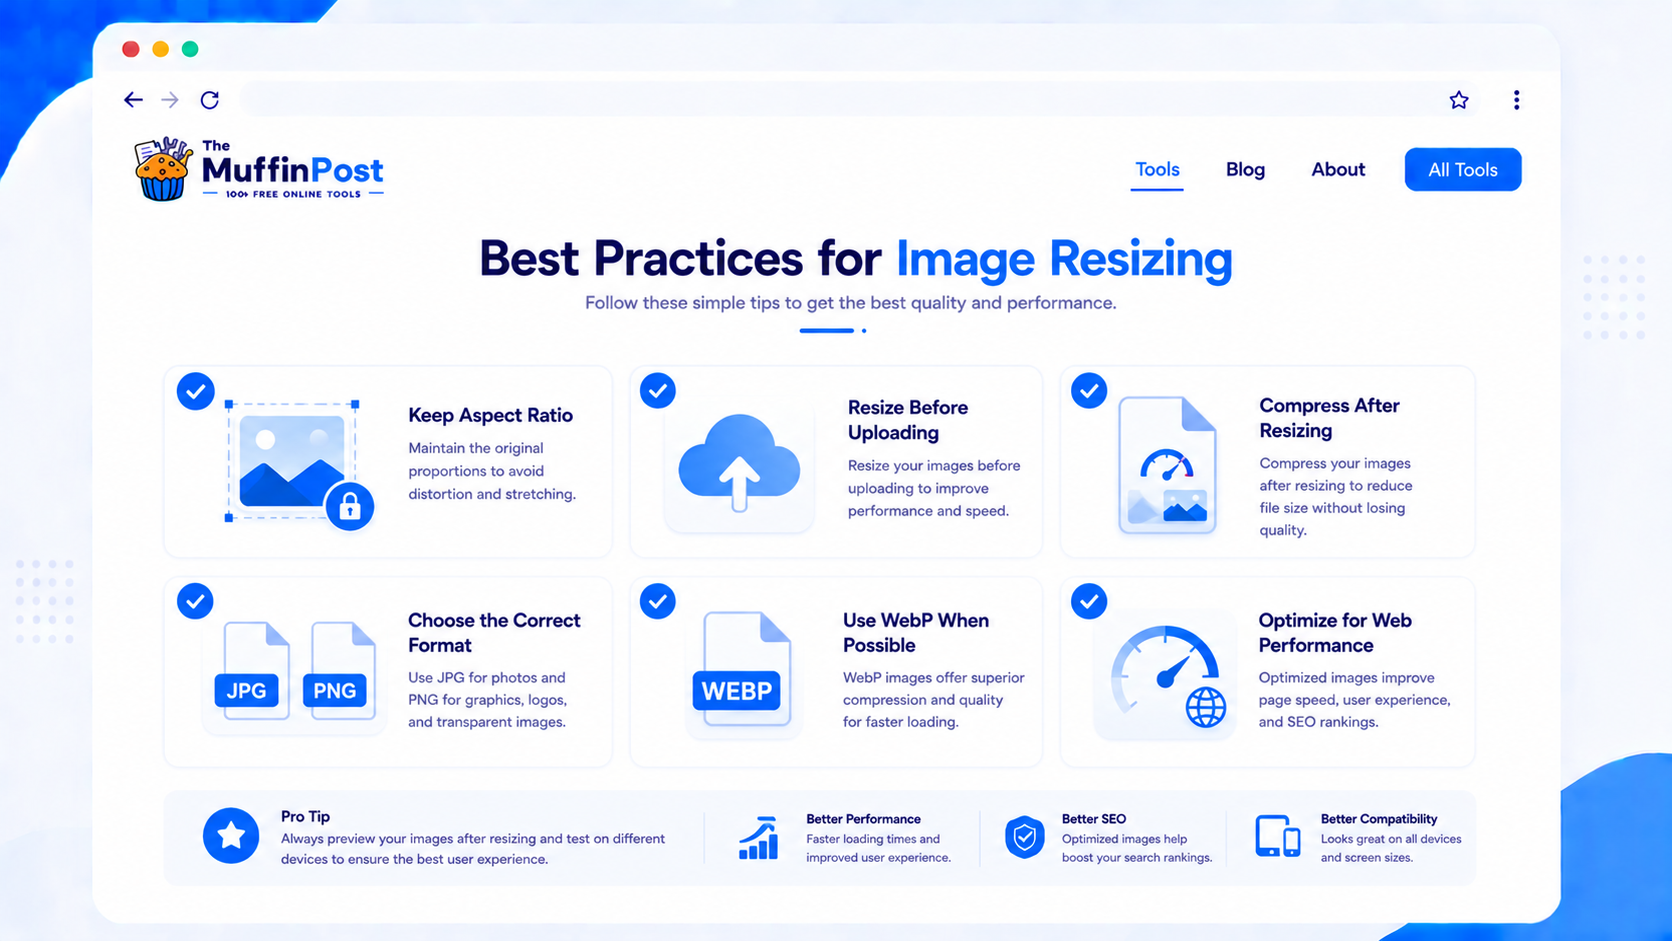
Keep aspect ratio
This prevents images from looking stretched, squeezed or unnatural.
Choose the format
Use JPG for photos, PNG for transparency and WebP for modern web performance.
Optimize after resizing
After resizing, compress the file to make it easier to upload and faster to load.
Image Learning Center
Continue with the complete image format and optimization guide collection.
Frequently asked questions
How do I resize an image online?
Open an image resizer, upload your image, enter the new width and height, keep aspect ratio if needed and download the resized file.
Can I resize an image without losing quality?
You can reduce dimensions with minimal quality loss. Enlarging a small image too much often causes blur or pixelation.
What is aspect ratio?
Aspect ratio is the relationship between width and height. Keeping it prevents images from looking stretched or squeezed.
What size should images be for websites?
It depends on the layout, but many blog hero images use 1200 × 675 and many banners use 1920 × 1080.
Should I compress images after resizing?
Yes. Compression can reduce file size further and improve website speed, email delivery and storage efficiency.
Can I resize JPG, PNG and WebP images?
Yes. Most online image resizers support common formats like JPG, PNG and WebP.
Is resizing the same as cropping?
No. Resizing changes image dimensions. Cropping removes part of the image area.
Which tools are related to resizing images?
Helpful related tools include Compress Image, Crop Image, JPG to WebP, PNG to WebP, JPG to PNG and PNG to JPG.
About the author
The MuffinPost Editorial Team creates practical guides for online tools, productivity, file conversion, calculators, marketing workflows and developer utilities.
Complete your image project
Resize, compress, crop, rotate and convert images using the complete collection of free browser-based image tools.
Resize Image NowCompress ImageBrowse Image Tools